

오늘은 실제 프로젝트에 적용한 React DnD에 대해 설명하고자 블로그를 쓰게 되었습니다.
이번 글에서는 react-dnd를 사용하여 칸반보드에서 이슈를 드래그하고 보드 간에 이동하는 기능을 구현하는 방법을 설명하겠습니다.
(드래그 앤 드롭에 대한 설명은 전 포스트에 자세히 작성되어있습니다 !! )
1. 프로젝트 구조
간략한 프로젝트 구조는 다음과 같습니다
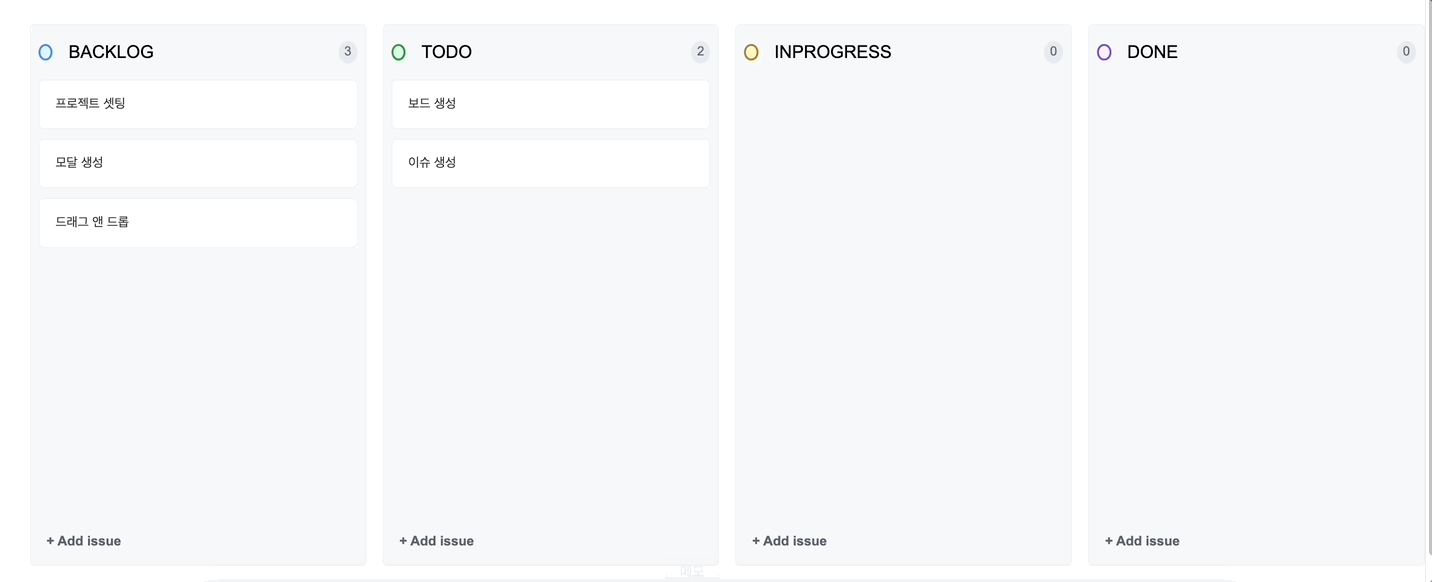
BoardList
  ├── Board
  │     ├── BoardHeader
  │     ├── BoardContent
  │     │     ├── Issue
  │     ├── AddItemButton
각 컴포넌트의 역할:
- BoardList: 여러 개의 Board를 포함하는 최상위 컨테이너
- Board: 하나의 칸반 보드를 나타내며, 이슈 목록을 관리
- BoardHeader: 보드의 제목과 아이콘을 표시
- BoardContent: 해당 보드에 포함된 이슈 목록을 렌더링
- Issue: 개별 이슈 카드
- AddItemButton: 새로운 이슈를 추가하는 버튼
2. react-dnd 적용 위치
이슈를 드래그할 때 해당 이슈가 활성화되고, 드롭될 보드도 활성화되도록 하기 위해 react-dnd를 적용할 위치는 다음과 같습니다.
- Issue 컴포넌트에 useDrag 적용
- Issue를 드래그할 수 있도록 설정합니다.
- isDragging 상태를 활용하여 이슈가 드래그 중임을 표시합니다.
- Board 컴포넌트에 useDrop 적용
- Board가 드래그된 Issue를 받을 수 있도록 설정합니다.
- isOver 상태를 활용하여 드래그된 Issue가 보드 위에 올라왔을 때 보드를 강조합니다.
이렇게 하면 사용자가 이슈를 드래그할 때 해당 이슈가 반투명해지고, 보드에 드래그 중일 때 보드의 테두리가 강조되는 등의 효과를 줄 수 있습니다.
3. react-dnd 설치 및 기본 설정
먼저, react-dnd와 react-dnd-html5-backend 패키지를 설치해야 합니다.
npm install react-dnd react-dnd-html5-backend
이후, DndProvider를 최상위 컴포넌트에 추가하여 드래그 앤 드롭 기능을 활성화해야 합니다.
import { StrictMode } from 'react';
import { createRoot } from 'react-dom/client';
import { Provider } from 'react-redux';
import { DndProvider } from 'react-dnd';
import { HTML5Backend } from 'react-dnd-html5-backend';
import { store } from './store/index.ts';
import './styles/global.css';
import App from './App.tsx';

createRoot(document.getElementById('root')!).render(
  <StrictMode>
    <Provider store={store}>
      <DndProvider backend={HTML5Backend}>  //<-- 추가
        <App />
      </DndProvider>
    </Provider>
  </StrictMode>,
);4. 드래그할 이슈 컴포넌트 구현
각 이슈(Issue) 항목을 드래그할 수 있도록 useDrag 훅을 활용하여 Issue 컴포넌트를 구현합니다.
import { useDrag } from 'react-dnd';
import styled from 'styled-components';
import colors from '../../styles/color';
import { IssueType } from '../../types/issueType';

const Container = styled.div<{ $isDragging: boolean }>`
  padding: 5%;
  display: flex;
  align-items: center;
  border: 1px solid ${colors.BOARD_BACKGROUND_BORDER};
  border-radius: 5px;
  background-color: white;
  cursor: grab;
  opacity: ${({ $isDragging }) => ($isDragging ? 0.5 : 1)};

  &:active {
    cursor: grabbing;
    border: 1px solid ${colors.DRAG_BORDER};
  }
`;

const Title = styled.div`
  font-size: 0.8rem;
  text-align: start;
`;

const Issue = ({ issues }: { issues: IssueType }) => {
  const [{ isDragging }, drag] = useDrag(() => ({
    type: 'ISSUE',
    item: { id: issues.id, boardId: issues.board_id },
    collect: (monitor) => ({
      isDragging: monitor.isDragging(),
    }),
  }));

  return (
    <Container ref={drag} $isDragging={isDragging}>
      <Title>{issues.title}</Title>
    </Container>
  );
};

export default Issue;코드 설명
- useDrag를 사용하여 이슈를 드래그 가능하도록 설정합니다.
- type: 'ISSUE'로 드래그 가능한 항목의 타입을 정의합니다.
- item 속성을 사용하여 드래그할 때 전달할 데이터를 설정합니다.
- collect 함수를 통해 현재 드래그 상태를 수집하여 UI 반영(투명도 조절 등)을 수행합니다.
5. 드롭할 보드 컴포넌트 구현
각 보드에 이슈를 드롭할 수 있도록 useDrop 훅을 활용하여 Board 컴포넌트를 구현합니다.
React DnD의 useDrop 훅을 활용하여 보드가 드래그된 아이템을 받을 수 있도록 설정하고, calculateDropIndex 함수를 사용해 이슈가 드롭될 정확한 위치(newIndex)를 계산합니다.
import { useRef } from 'react';
import { useDrop } from 'react-dnd';
import styled from 'styled-components';
import colors from '../../styles/color';
import BoardHeader from './BoardHeader';
import { BoardProps } from '../../types/boardType';
import AddIssueButton from './AddIssueButton';
import BoardContent from './BoardContent';
import { calculateDropIndex } from '../../utils/calculateDropIndex';
const Container = styled.div<{ $isOver: boolean }>`
  height: 75vh;
  min-width: 45%;
  display: flex;
  flex-direction: column;
  align-items: center;
  gap: 1rem;
  padding: 1rem 0.5rem;
  background-color: ${colors.BOARD_BACKGROUND};
  border: ${({ $isOver }) =>
    $isOver ? `1px solid ${colors.DRAG_BORDER}` : `1px solid ${colors.BOARD_BACKGROUND_BORDER}`};
  border-radius: 5px;
  position: relative;
  transition: border 0.2s ease-in-out;
`;

const Board = ({ icons, board, onDrop }: BoardProps) => {
  const containerRef = useRef<HTMLDivElement>(null);

  const [{ isOver }, drop] = useDrop(() => ({
    accept: 'ISSUE',
    drop: (item: { id: number; boardId: number }, monitor) => {
      const offset = monitor.getClientOffset();
      if (!offset || !containerRef.current) return;

      const newIndex = calculateDropIndex(board.issues, offset, containerRef); // <- 아래에 자세한 설명
      onDrop(item.id, board.id, newIndex);
    },
    collect: (monitor) => ({
      isOver: monitor.isOver(),
    }),
  }));

  return (
    <Container ref={drop} $isOver={isOver}>
      <BoardHeader icons={icons} name={board.name} issue_count={board.issue_count} />
      <BoardContent ref={containerRef} issues={board.issues} />
      <AddIssueButton boardId={board.id} />
    </Container>
  );
};

export default Board;코드 설명
- useDrop을 사용하여 보드가 특정 타입('ISSUE')의 아이템을 받을 수 있도록 설정합니다.
- drop 속성에서 onDrop을 호출하여 드래그된 이슈의 ID와 이동할 보드의 ID 및 newIndex를 전달합니다.
- collect 함수를 통해 isOver 값을 가져와 보드에 드래그된 아이템이 올라왔을 때 UI를 변경할 수 있습니다.
calculateDropIndex.ts
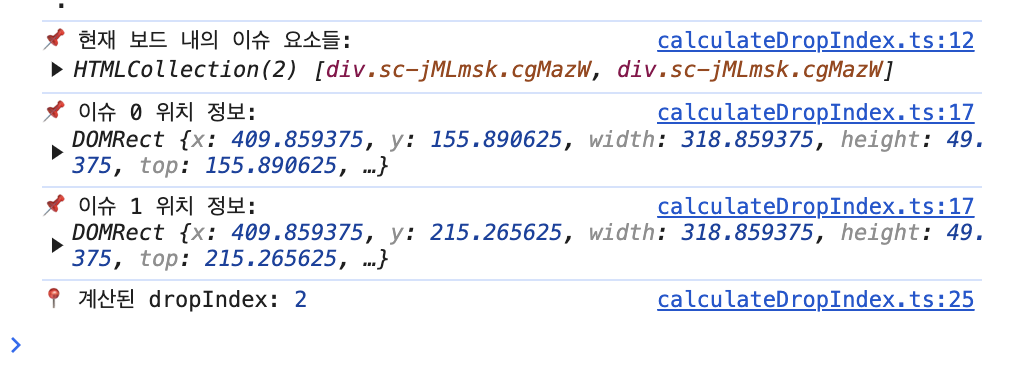
드롭한 이슈가 보드 안에서 몇 번째 위치에 들어가야 하는지(newIndex)를 계산하는 역할
export const calculateDropIndex = (
  issues: { id: number }[],
  offset: { x: number; y: number },
  containerRef: React.RefObject<HTMLDivElement>,
) => {
  if (!containerRef.current) return 0; // 컨테이너가 없으면 첫 번째 위치 반환
  if (!issues || issues.length === 0) return 0; // 이슈가 없으면 첫 번째 위치 반환

  const issueElements = containerRef.current.children; // 모든 이슈 요소 가져오기
  let dropIndex = issues.length; // 기본적으로 마지막 위치

  console.log('📌 현재 보드 내의 이슈 요소들:', issueElements);

  // 🔥 드롭된 위치를 기준으로 가장 가까운 이슈의 인덱스 찾기
  for (let i = 0; i < issueElements.length; i++) {
    const rect = issueElements[i].getBoundingClientRect();
    console.log(`📌 이슈 ${i} 위치 정보:`, rect);

    if (offset.y >= rect.top && offset.y <= rect.bottom) {
      dropIndex = i;
      break;
    }
  }

  console.log('📍 계산된 dropIndex:', dropIndex);
  return Math.min(Math.max(dropIndex, 0), issues.length); // 최대 인덱스를 넘지 않도록 제한
};
- 사용자가 드래그해서 보드에 놓은 마우스 위치(offset.y) 를 가져온다.
- 각 이슈의 실제 위치(getBoundingClientRect()) 와 비교해서 적절한 새로운 인덱스(newIndex) 를 결정한다.
6. Redux와 onDrop 핸들러 적용
현재 react-dnd만 적용하면 화면 상태가 즉시 반영되지 않습니다. ( react-dnd는 DOM에서 드래그 앤 드롭 이벤트를 관리할 뿐 상태를 직접 변경하지 않기 때문 )
따라서 상태를 변경해야 리렌더링이 발생하기 때문에 상태 관리가 필요합니다. 저는 현재 RTK 를 연습겸 프로젝트에 적용했기 때문에
드래그 이벤트가 발생할 때 Redux 스토어를 업데이트하도록 설정했습니다.
BoardList에서 Redux 상태 관리
BoardList 컴포넌트에서 Redux의 상태를 가져와 보드 목록을 관리하고, onDrop 핸들러를 구현하여 보드 간 이슈 이동을 처리합니다.
import { useEffect } from 'react';
import { useSelector, useDispatch } from 'react-redux';
import { fetchBoards, moveIssue } from '../../store/board/boardSlice';
import { RootState, AppDispatch } from '../../store';
import MainLayout from '../layout/MainLayout';
import Board from './Board';

const BoardList: React.FC = () => {
  const dispatch = useDispatch<AppDispatch>();
  const { boards, loading, error } = useSelector((state: RootState) => state.board);

  useEffect(() => {
    dispatch(fetchBoards());
  }, [dispatch]);

  if (loading) return <p>Loading...</p>;
  if (error) return <p>Error: {error}</p>;

  const handleDrop = (id: number, newBoardId: number, newIndex: number) => {
    dispatch(moveIssue({ id, newBoardId, newIndex }));
  };

  return (
    <MainLayout>
      {boards.map((board) => (
        <Board
          key={board.id}
          icons={board.name.toUpperCase() as 'BACKLOG' | 'TODO' | 'INPROGRESS' | 'DONE'}
          board={board}
          onDrop={handleDrop}
        />
      ))}
    </MainLayout>
  );
};

export default BoardList;handleDrop 함수 설명
- onDrop 이벤트가 발생하면 handleDrop 함수가 실행됩니다.
- moveIssue({ id, newBoardId , newIndex}) 액션을 디스패치하여 Redux 스토어의 상태를 변경합니다.
- 이를 통해 화면이 자동으로 업데이트됩니다.
7. MoveIssue 액션 구현 (이슈 간 이동과 보드 간 이동 구현 ) ( 코드 일부 )
   moveIssue: (
      state,
      action: PayloadAction<{ id: number; newBoardId: number; newIndex: number }>,
    ) => {
      const { id, newBoardId, newIndex } = action.payload;
      let movedIssue: IssueType | any = null;
      let previousBoard: any = null;

      // 1️⃣ 기존 보드에서 이슈 찾고 제거
      state.boards.forEach((board) => {
        const issueIndex = board.issues.findIndex((issue) => issue.id === id);
        if (issueIndex !== -1) {
          movedIssue = board.issues.splice(issueIndex, 1)[0];
          previousBoard = board;
        }
      });

      if (!movedIssue) {
        return;
      }

      movedIssue.board_id = newBoardId;
      const newBoard = state.boards.find((board) => board.id === newBoardId);

      if (newBoard) {
        // 2️⃣ newIndex가 유효하면 해당 위치에 삽입, 아니면 마지막에 추가
        const insertIndex = Math.min(newIndex, newBoard.issues.length);
        newBoard.issues.splice(insertIndex, 0, movedIssue);
      }
    },
8. 마무리
이번 포스팅에서는 React DnD와 Redux를 활용하여 칸반보드에서 이슈를 이동하는 기능을 구현해봤습니다. 같은 보드 내에서 이슈의 순서를 변경할 수도 있고, 다른 보드로 이슈를 옮길 수도 있도록 만들었습니다.
이번 작업에서 가장 어려웠던 부분은 보드 내에서 이슈 순서를 바꾸는 로직을 구현하는 것이었습니다 !!! ㅜㅜ (정말 힘들었습니다.. )
드롭된 위치를 정확하게 계산해야 했고, getBoundingClientRect()를 활용해서 사용자의 마우스 위치를 기준으로 올바른 인덱스를 찾는 과정이 쉽지 않았습니다. 그래도 하나하나 해결해 나가면서 결국 원하는 기능을 완성할 수 있었습니다 !!!!!
추가적으로 아직 이 기능을 실제 서버와 연동하지는 않았기 때문에.. ! 다음 포스팅에서는 Supabase를 활용해서 서버와 데이터를 연동하는 과정을 다뤄보려고 합니다. !! 긴 글 읽어주셔서 감사합니다 !!
** 댓글은 언제나 환영입니다 !! **

'리액트' 카테고리의 다른 글
| TanStack Query (React Query) 공식문서 정복하기 (2) (0) | 2024.06.11 |
|---|---|
| TanStack Query (React Query) 공식문서 정복하기 (1) (1) | 2024.06.10 |
| [리액트] 웹 배포 시 다크모드가 설정되어 CSS가 깨지는 경우엔 ? (0) | 2024.02.21 |
| 솔로프로젝트 - MaMaMeMo (아이디어 기획 및 디자인) (0) | 2023.09.11 |
| [블로깅 챌린지] 리액트로 간단한 컴포넌트 구현하기 (0) | 2023.05.03 |